Automate your Christmas Content Switchover
Automation is King. Using Fresh Relevance’s Marketing Rules, you can automatically switch over personalisation content across multiple channels and touchpoints.
By using Experiences, you can create and test your whole Christmas campaign, then automate the date & time when you’d want this to switch over and switch back.
Alternatively, only swap out individual pieces of content using the content’s Slot Marketing Rules.
EXAMPLE

Step 1 – Create your Christmas Content
Create your Christmas campaign SmartBlocks, some ideas include:
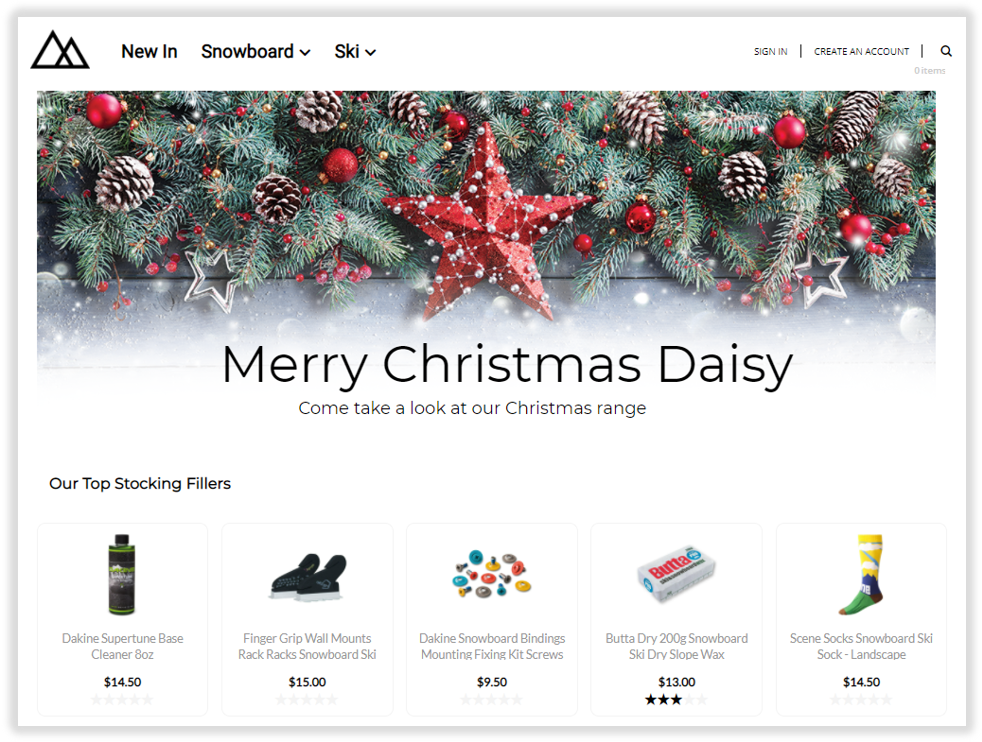
- Stocking Filler Recommendations – Recommend products under £20 or use the Impulse Buys data source for high converting products
- Wish Customers a Merry Christmas – Use Name personalization to personally wish your customers a Merry Christmas
- Countdown to Christmas Delivery Cut-off – Create Urgency with customers to place their orders before the Christmas Delivery cut-off
- Highlight Good Delivery Service Reviews – With the Social Proof Module, filter a Review SmartBlock to high ratings that mention ‘Delivery’
- Highlight Christmas Social Media content – Filter your Instagram or Twitter SmartBlocks to posts with your #Christmas hashtag
- Highlight Christmas Discounts with Coupons – Switch out your coupon codes for a FE5T1VE feel
Step 2 – Create your Christmas Experience
- On the left hand Nav, go to Content | Experiences
- Click Create Experience
- Name and Save your Experience
Step 3 – Assign Content to Your Christmas Experience
For Web content, we recommend using our Site Editor:
- On the Left hand Nav, Click Content | Experiences and click into your Experience
- Click Add next to Site Editor content
- Drag and Drop your content into your website
Alternatively you can assign content to an Experience using Slot Marketing Rules:
- In the left Nav, Click Content | Experiences and click into your Experience
- In the top tabs select your Email or Website dependent on your deployment and click Add to Slot
- Select the Slot you’d like to assign to an Experience, to enter it’s Rule Set
- Drag the Person | On Experience Rule into your Rule tree
- Click on the Rule and select your Experience
- Click Add SmartBlocks and drag the SmartBlock you’d like to show to that Experience into the Yes path of the Tree
- Save your Slot
Step 4 – Test your Experience
Preview your Web Content by previewing your website in the Site Editor:
- On the left Nav, got to Content | Site Editor
- Click Preview to open your website in a new tab with a content preview
- Use the Site Info Bar Experience drop down to preview what your website will look like when assigned to different Experiences. You can also select multiple Experiences to see how they interact
To test your email content you will need to issue the email to a test address which matches each Experience’s criteria. e.g. to test a new customer Experience, create a new email address and follow your signup process.
Step 5 – Automate Experience Switchover
In order to automate your campaign switchover, we will use Experience Rules to swap out to the Christmas Experience.
- On the left hand nav, go to Content | Experiences
- Click Manage Experience Rules
- Click on the active Rule Set. Note that if you have multiple active Rule Sets, select the set of Rules with the most content you want to switch out
- Drag the Time | Date Range filter into the Rule Tree, and configure the Start and End dates for your Christmas Campaign
- Assign your Christmas Experience to the Yes pathway of the Tree
Swapping out an individual piece of content
Step 1 – Create your Christmas Content
Create your Christmas campaign SmartBlocks, some ideas include:
- Stocking Filler Recommendations – Recommend products under £20 or use the Impulse Buys data source for high converting products
- Wish Customers a Merry Christmas – Use Name personalization to personally wish your customers a Merry Christmas
- Countdown to Christmas Delivery Cut-off – Create Urgency with customers to place their orders before the Christmas Delivery cut-off
- Highlight Good Delivery Service Reviews – With the Social Proof Module, filter a Review SmartBlock to high ratings that mention ‘Delivery’
- Highlight Christmas Social Media content – Filter your Instagram or Twitter SmartBlocks to posts with your #Christmas hashtag
- Highlight Christmas Discounts with Coupons – Switch out your coupon codes for a FE5T1VE feel
Step 2 – Create your content slot
If you wish to swap out existing content, simply navigate to the Slot that is currently serving the SmartBlock by going to Content | Slots
If you have additional content you only want to show for Christmas, Navigate to your Christmas Content and click Publish and Use and follow the on-screen Slot creation process
Step 3 – Create Slot Rules
- In your Slot click on the Rules tab
- Drag the Time | Date Range filter into the Rule Tree, and configure the Start and End dates for your Christmas Campaign
- Assign your Christmas Experience to the Yes pathway of the Tree. If you want to serve different content outside of the Christmas dates, add this content to the No pathway. If this is additional content for Christmas, simply use the No Content SmartBlock in the No pathway
Step 4 – Test your content
Each piece of content should be tested as appropriate without the time based Slot rule:
- For content deployed to the website, group your time based Slot Rule with a URL testing Parameter, to display your content over the christmas dates Or when the test Parameter is enabled. Learn how to test your Fresh Relevance website content like a Pro in this How-to Article
- For content deployed via email, you can either create a new test Slot and issue via email with no rules, or test like a Pro, using email Merge Parameters
