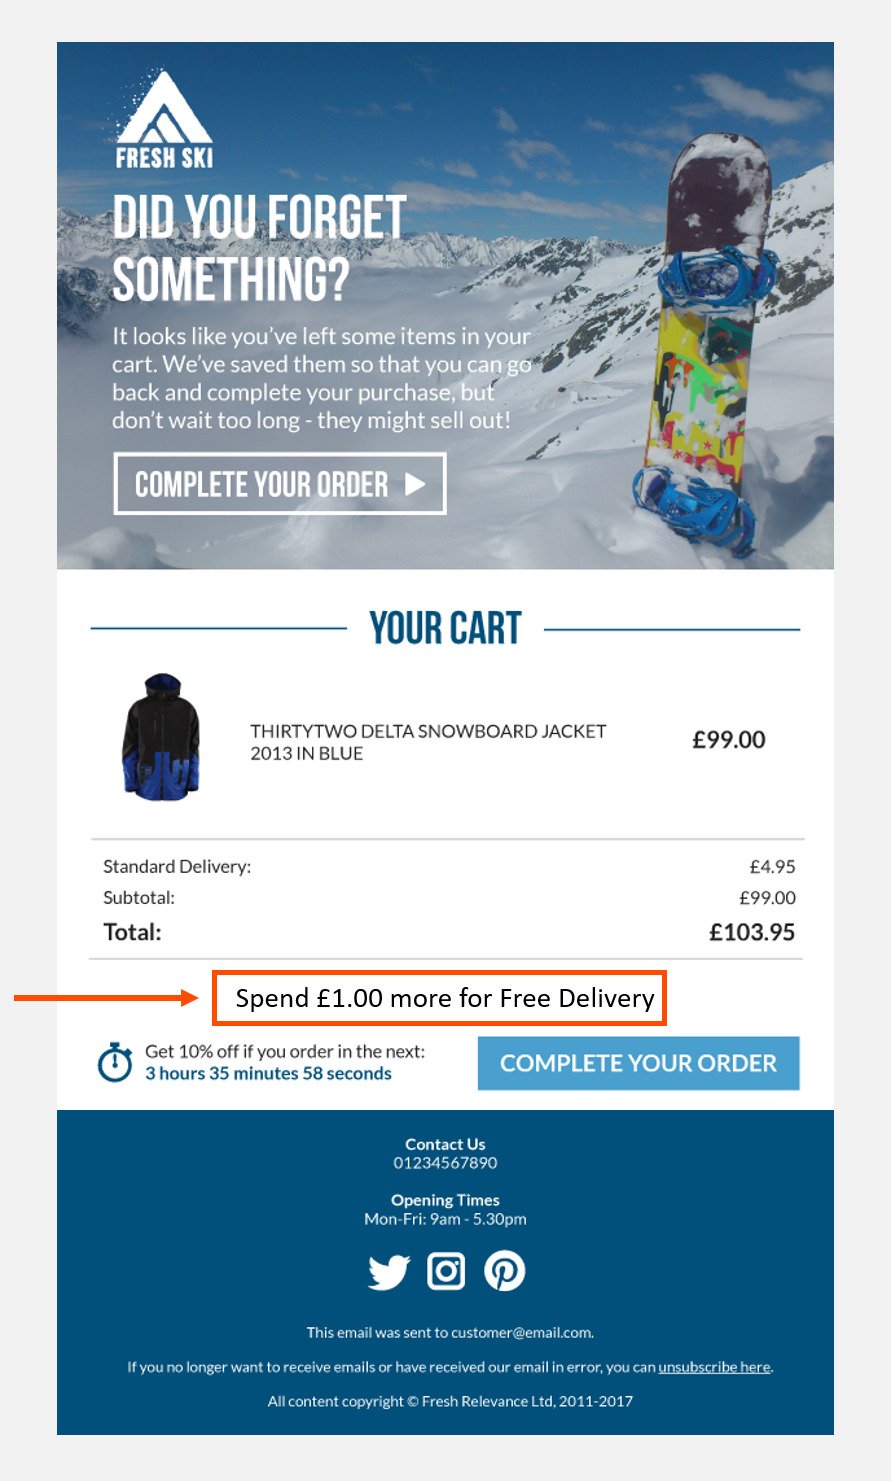
Push customers over your free delivery threshold with Cart Abandon email banners
Increase your Average Order Value by telling customers how much more they have to spend to reach your Free Delivery Threshold.
Free delivery is a key driver for customers to add more items to their basket – why not receive additional products rather than paying for delivery?
One tactic to encourage customers to do this, is by displaying some text that dynamically:
- Confirms Free Delivery if the cart total is over the Free Delivery Threshold, or:
- Displays the additional amount they need to spend to achieve Free Delivery
There are several ways to include this depending on your requirements, our favourite options are detailed below:
- Adding to your Cart Layout – Your Cart Layout is generated in Fresh Relevance. You can add Free Delivery in here . Note that this is also the approach for adding to any area if you’re using the integrated ESP.
- Adding to other areas of your email (i.e. outside the Cart Layout) – You can create the logic in Fresh and pass the textual output to a field in your ESP. You can then use this in other areas of your email built in your ESP, for example the email header.
Before you get started
- If delivery costs are included in your Cart Total, you will need to use a Cart Subtotal Variable – contact support to confirm if this is captured and the variable to use: [email protected]
- Have a configured Trigger Program. You can find instructions on setting this up here: https://admin.freshrelevance.com/help/trigger_programs/
How to add to your Cart Layout
Step 1 – Navigate to your Cart Layout
- On the left nav, click Content | Cart Layout
- Hover over the Cart Layout you wish to add this to, and click View
Step 2 – Identify where to put this message
You can add this messaging before, after or within the content shown on screen.
If you wish to show within (e.g. between the products and Complete order button), use your Browser Inspector to find where in the code you’d like to place it.
Core elements of code are often marked up in HTML comments
e.g.
You can find our how to use your Inspector here: https://www.alphr.com/how-to-use-inspect-element/
Step 3 – Create your messaging
The message is shown dynamically, so requires some code. There’s no need for you to be able to code, simply to edit some core values within our pre-defined codes here:
Step 4 – Add the code to your Cart Layout
Ensure that any Trigger Programs using the Cart Layout you want to add this to is Paused before making changes
- Under Actions, Click Edit Layout
- Paste the code into your Cart Layout code
- Click Save
Step 5 – Test
- On the left hand nav click Triggers
- Select the email program using the Cart Layout you edited
- Click Send test emails
Step 6 – Go live
Add your Trigger Program to your Rule tree.
We recommend that you run your programs first using the Catch-all feature to check your emails are firing as expected.
Once you’re happy you can also move your email to the BCC field so you can monitor go live for additional confidence
Find these settings by clicking on your Trigger Program, then click Configure Trigger Program
How to add via your ESP
Step 1 – Create ESP Field Mapping
- Go to Settings | ESP
- Next to the ESP in use, click Field Mappings
- On the Field Name dropdown leave as Custom – add your own
- In the ESP Fieldname box type in the fieldname you wish to pick up in your ESP e.g. threshold_text.
- Click Add
Step 2 – Add your message code
Your Field will now sit at the bottom of the list – you will see it under ESP Fieldname
- In that same row, click on the text Click to edit in the Fieldname column
- Add in the Jinja code to dynamically calculate the text to pass through. You can find the code and editing instructions here:
Step 3 – Edit your email in your ESP
Now you have the value being passed through to your ESP, you can use this variable where you would like in your ESP builder.
You can find details on your ESP’s Field Mapping by navigating to Settings | ESP | Field Mappings
Step 4 – Test
Test emails by selecting your Trigger Program, and Send test emails
Step 5 – Launch
Add your Trigger Program to your Rule tree.
We recommend that you run your programs first using the Catch-all feature to check your emails are firing as expected.
Once you’re happy you can also move your email to the BCC field so you can monitor go live for additional confidence.
Find these settings by clicking on your Trigger Program, then click Configure Trigger Program

